1. One-on-one critique with students as they are working is incredibly important. If you do not check on students throughout the process, they will not push themselves, and end up unhappy with their work.
2. Great prompts make life a lot easier. If you have good questions, students will better understand what they are supposed to be taking away from a project, and discussion will be a lot more meaningful.
3. Be flexible. Listen to what your students want, and do not be afraid to adapt the lesson to fit their needs. It makes the lesson a lot more enjoyable overall.
4. Establish a balance between friend and authoritative figure. This will make it easier to keep control of the class, while still remaining approachable to your students.
5. Make the most of your time! Come up with ways to help students keep track of the time and work efficiently.
6. Keep the classroom fun. Try and avoid stereotypical art projects. Kids most likely have already done them a million times and will not put their all into the project.
7. Treat your students like artists with their own voice and style. They will take their work more seriously, and create better products because of it.
8. Listen to your students. Whether it is an idea for an assignment, or their plans for the weekend, show you care. They really appreciate it, and it builds up the class community really fast.
9. Sometimes requirements are not a bad thing! Having more requirements keeps your students pushing themselves to meet your expectations. Just keep them vague, so they still have room to work around the different mediums and explore.
10. Care. I know this will be a lot harder to do when I have class loads of 100+ students, but remembering things that they had told me a couple weeks ago, or asking how their weekend plans went meant a lot to them. This helped keep the class fun and comfortable, and kept them coming back!
UAY
Wednesday, May 6, 2015
Community Time
Rules:
-Our first activity consisted of coming together as a group to create rules for all students to follow.
-Since a lot of the students came from UAY and already understood the idea of UPR, this activity was not effective, and resulted in a very quiet community time. In retrospect, a more interactive activity would have been best, to get the students moving around and excited for the classes.
Pencil Cases:
-Students took clear packing tape, and decorated the sticky side with tissue paper before sealing the design with more tape. Students would then fold the tape, and seal the edges, to create the final product.
-I think project was a success, because students could either do this quickly and return to conversing with their peers, or take up the whole time to create the project. The only people who took longer than the allotted time were those who were not staying on task.
Cups:
-Students were given ceramic mugs and made their own designs on the mugs using Sharpie. After they were done, these cups were taken and baked in an oven to set the design, before returning them to the students.
-This project also worked out well, because it gave students a lot of freedom to create whatever they wanted. It was also a simple activity, so they could draw and talk at the same time.,
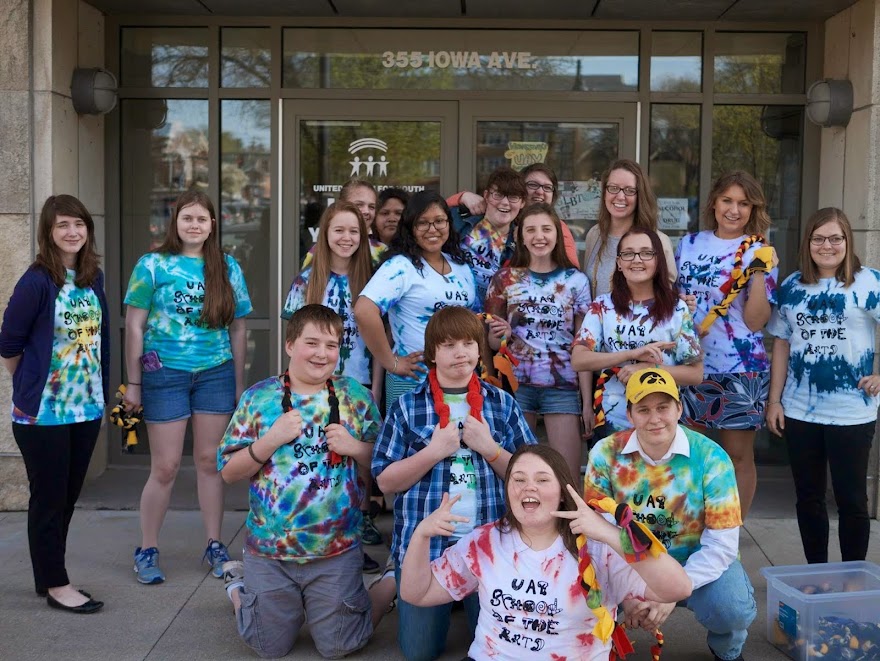
T-Shirt Designs:
-Every year, UAY creates shirts for the art workshops,and the students are the ones who create the letters for the front and their own designs for the back. We decided that the design on the back would be something that they felt represented themselves- i.e. animal, form, object, etc.
-This was similar to the cup activity, because students could easily multitask. Since we kept the design they had to create for the back open and vague, we also got a lot of really neat drawings to put on the t-shirt.
Tie-Dye Shirts:
-To make each students t-shirt even more unique, we decided to have a community time spent tie-dyeing their shirts before the designs were printed onto them. Students were taught a few different ways to roll/fold their shirts, and after choosing their design, were then sent into the other room to start adding the color to their shirts.
-Although this activity was the coolest, it was definitely the most difficult and labor intensive. During community time, the students typically like to kick back and relax for a bit before going into the activity we have planned for them, but tie-dyeing was going to require all of the time. So trying to push students along to make sure they completed their shirt was very stressful, and it was a difficult transition from community time to class time. It also added more work for us outside of class, because we each had to take five shirts home to rinse off and wash before the next Thursday.
Sharpie Designs:
-Since the method of adding the designs onto the t-shirts was silkscreen, the t-shirt designs had to be outlined in Sharpie, so that they would show through the screen.
-We initially thought that the students might appreciate the down time before having to start class, but it took them a really short time to outline their designs. The amount of time between them finishing and class beginning was really awkward, but adding in another activity might have proved to have been more hectic. This day could have been combined with the first t-shirt design day, but it was a detail that slipped our minds.
Dog Tugs:
-Our professor, Clar Baldus, encouraged the idea of eventually taking the focus off of the self and towards society, which is when we decided to do a community project. We then came up with the idea to create dog tugs, and donate them to local dog shelters in the area. We had cut long strips of fleece prior to the class, so all the students would have to do is braid them into tugs. Since the braids had to be really tight, it was best for students to buddy up, so one could hold the knot while the other braided.
-I think this was another successful project, because the students who wanted to do the activity and go back to snacking could create just one dug tug, and those who wanted to stay engaged throughout the whole period could create two to three. The time management was a lot better on this activity, and I think the students enjoyed the opportunity to give back to the community.
Artist Statements:
-Since most of us were going to be focusing on artist statements during this lesson, we decided to have an intro activity to get all of the students into the right schema. After discussing what an artist statement consists of, we put a prompt on the board, and then allowed the rest of the time for students to write out an outline for their own artist statements that they could later use in class.
-I do not think that the discussion went as well as we would have hoped, and we only had our prompt questions up on the board, despite encouraging them to chip into what they think would be a good question. Also, despite reminding my students about their outlines in my class, I do not think they even glanced at them while they were writing their final artist statement for their works.
-Our first activity consisted of coming together as a group to create rules for all students to follow.
-Since a lot of the students came from UAY and already understood the idea of UPR, this activity was not effective, and resulted in a very quiet community time. In retrospect, a more interactive activity would have been best, to get the students moving around and excited for the classes.
Pencil Cases:
-Students took clear packing tape, and decorated the sticky side with tissue paper before sealing the design with more tape. Students would then fold the tape, and seal the edges, to create the final product.
-I think project was a success, because students could either do this quickly and return to conversing with their peers, or take up the whole time to create the project. The only people who took longer than the allotted time were those who were not staying on task.
Cups:
-Students were given ceramic mugs and made their own designs on the mugs using Sharpie. After they were done, these cups were taken and baked in an oven to set the design, before returning them to the students.
-This project also worked out well, because it gave students a lot of freedom to create whatever they wanted. It was also a simple activity, so they could draw and talk at the same time.,
T-Shirt Designs:
-Every year, UAY creates shirts for the art workshops,and the students are the ones who create the letters for the front and their own designs for the back. We decided that the design on the back would be something that they felt represented themselves- i.e. animal, form, object, etc.
-This was similar to the cup activity, because students could easily multitask. Since we kept the design they had to create for the back open and vague, we also got a lot of really neat drawings to put on the t-shirt.
Tie-Dye Shirts:
-To make each students t-shirt even more unique, we decided to have a community time spent tie-dyeing their shirts before the designs were printed onto them. Students were taught a few different ways to roll/fold their shirts, and after choosing their design, were then sent into the other room to start adding the color to their shirts.
-Although this activity was the coolest, it was definitely the most difficult and labor intensive. During community time, the students typically like to kick back and relax for a bit before going into the activity we have planned for them, but tie-dyeing was going to require all of the time. So trying to push students along to make sure they completed their shirt was very stressful, and it was a difficult transition from community time to class time. It also added more work for us outside of class, because we each had to take five shirts home to rinse off and wash before the next Thursday.
Sharpie Designs:
-Since the method of adding the designs onto the t-shirts was silkscreen, the t-shirt designs had to be outlined in Sharpie, so that they would show through the screen.
-We initially thought that the students might appreciate the down time before having to start class, but it took them a really short time to outline their designs. The amount of time between them finishing and class beginning was really awkward, but adding in another activity might have proved to have been more hectic. This day could have been combined with the first t-shirt design day, but it was a detail that slipped our minds.
Dog Tugs:
-Our professor, Clar Baldus, encouraged the idea of eventually taking the focus off of the self and towards society, which is when we decided to do a community project. We then came up with the idea to create dog tugs, and donate them to local dog shelters in the area. We had cut long strips of fleece prior to the class, so all the students would have to do is braid them into tugs. Since the braids had to be really tight, it was best for students to buddy up, so one could hold the knot while the other braided.
-I think this was another successful project, because the students who wanted to do the activity and go back to snacking could create just one dug tug, and those who wanted to stay engaged throughout the whole period could create two to three. The time management was a lot better on this activity, and I think the students enjoyed the opportunity to give back to the community.
Artist Statements:
-Since most of us were going to be focusing on artist statements during this lesson, we decided to have an intro activity to get all of the students into the right schema. After discussing what an artist statement consists of, we put a prompt on the board, and then allowed the rest of the time for students to write out an outline for their own artist statements that they could later use in class.
-I do not think that the discussion went as well as we would have hoped, and we only had our prompt questions up on the board, despite encouraging them to chip into what they think would be a good question. Also, despite reminding my students about their outlines in my class, I do not think they even glanced at them while they were writing their final artist statement for their works.
Student Characteristics
Kelly:
Kelly is a senior at City High, who is a very creative student. She pushed herself in creating interesting, abstract forms in all of the projects she participated in, and had some really strong pieces in the show. I think her weakness is that she struggles with commitment, and because of this, it was difficult to fully assess her work since there was not much of it.
I think Kelly really respected my opinion on her work, and would confer with me about ideas before starting on a project. I tried to be very open with her, so she felt comfortable discussing ideas for her work with me.
Maya:
Maya is another student at City High that was in my class. Although, she believes herself to be a goofy girl, her use of intricate designs in her work show a complex side to her.
During the "sad" week it was Maya who failed to push herself in the assignment. Although her work was pretty, everyone agreed that they wished it was bigger, so they could see more of the design. That was when I realized that a size requirement was necessary, to make sure that students were not playing it too safe. After that, her work became much bigger, and you could see the intricacies of her designs a lot more.
Anna:
Anna is an eighth grader in one of the Iowa City middle schools, with a very big personality. She started out as being my quiet student, but as she grew more comfortable in the classroom, she really started to come out and show that she was actually a quirky, young girl.
I think how I helped Anna out the most was providing so much freedom in the class and a bunch of new mediums to work with. She enjoyed all the different projects, and she was a lot more consistent in her work. She jumped right into any medium, and had no issues experimenting with the new techniques. When I established the size requirement for the anxiety project, she exceeded that requirement and created an amazing abstract piece,
Alex:
Alex is also a senior at City High, who was already taking a couple of art classes before taking my own- those being Advanced Photo and a drawing class.
I think Alex did have issues with self-confidence, and so my task with her was to provide her plenty of encouragement and positive feedback. I tried to make sure it was not all coming from me, though, which is why I tried to always include one positive statement from classmates during critique. During the final class, when we discussing our work overall, Alex was struggling to come up with her strong points in her work. Instead of trying to force something out of her or provide my own opinion, I had her classmates look at her work, and tell her what they most enjoyed about her pieces. I think she appreciated hearing other people's opinions about her work, and I think it showed her that she did have success with her projects.
Something that I had to learn to do for all of my students to help them advance their ideas, is to start doing one-on-one critiques with them as they were still working on their projects. Prior to these, they were all playing it pretty safe, and creating small simple forms. When we all came to this realization, though, they decided to start pushing themselves to create bigger work, while I decided to check in on them occasionally to see where they were at in their process. I think because of this, their artworks became much more interesting and complex, and I think they were especially proud of those pieces.


Lesson Plan 8 - Outline and Process
This lesson was a lot more of a hodge podge, because we were trying to prepare for the show the next week. Since students still had a couple things to glaze, the first half of class was spent glazing the rest of their work. Because I wanted them to make the most of their time, we discussed some different ideas on how we could present our work at the show. We discussed some different ideas, and I suggested some ideas that they all ended up agreeing with. Since some were very aware of the deadline, and rushing to finish their works, I also spoke to them about how it is okay to present unfinished work. I think this calmed them down a bit, and helped them to prioritize the work they really wanted to show. After glazing, students brought out writing materials and wrote the title, name, medium, and statement for each of their pieces, as well as an overall artist statement for their work. Then, we finalized our ideas for how we wanted to present the work at the show. Finally, we ended the class discussing their work as a whole, and what direction they eventually wanted to take their work in.
I think this class was more or less okay, but I really should have set up better prompts for their general statements about their works. I think they did well enough on their artist statements, but for the individual pieces, the statements were general and not very insightful. These works were supposed to be expressing emotion, and explain to the general audience what these works were representing, and I did not convey that to them very well. Other than that, it went very well, and I think they did a great job reflecting on their work as a whole.


I think this class was more or less okay, but I really should have set up better prompts for their general statements about their works. I think they did well enough on their artist statements, but for the individual pieces, the statements were general and not very insightful. These works were supposed to be expressing emotion, and explain to the general audience what these works were representing, and I did not convey that to them very well. Other than that, it went very well, and I think they did a great job reflecting on their work as a whole.


The HeART of All Things Clay - Lesson Plan 8
Title: The HeART
of All Things Clay
Level or Course: Grades 9-12
Time Needed: 95 minute sessions
Level or Course: Grades 9-12
Time Needed: 95 minute sessions
Over all Goals: Description & Purpose. Include:
·
What “big
idea/concept” is the focus of this lesson? This is the larger theme that is
explored in the lesson these are broad ideas such as identity, loss, etc.
o
Proper glaze technique
o
How to present your ceramic work
·
Why is it
important for students to participate in this experience?
o
We think that we are done with a piece once it
is finished being fired, but we need to consider how each piece needs to be
presented to the public. Artist statements are also a great way to explain your
art work to the viewer without having to be there to explain it each time
someone questions it.
·
What art
content/concept or technical skill are the students learning?
o
Presenting ceramic work
o
Writing artist statements
o
Reflecting on work
Objectives: What do you hope to accomplish? Include
multiple objectives that address content, academic skills, social skills,
etc. Use the following format: TLW (The
Learner will). Each objective should include WHAT the student will learn and
HOW the student will learn it. The assessment is directly connected to these
objectives.
TLW reflect on each work by writing meaningful comments on
their artist statement.
TLW discuss and illustrate ideas on how they want their work
to be presented at the show.
TLW analyze their work in the classroom, and discuss what
direction they want to take in future projects.
NAEA Standards: Generally a
lesson focuses on a few of the standards.
Presenting
Anchor Standard 4: Select, analyze, and interpret
artistic work for presentation.
Proficient:
Analyze, select, and curate artifacts and/or artworks for presentation
and preservation.
Accomplished: Analyze, select,
and critique personal artwork for a collection or portfolio presentation.
Advanced: Critique, justify, and present choices in
the process of analyzing, selecting, curating, and presenting artwork for a
specific exhibit or event.
What criteria,
methods, and processes are used to select work for preservation or
presentation? Why do people value objects, artifacts, and artworks, and select
them for presentation?
Anchor Standard
6: Convey meaning through the presentation of artistic work.
Proficient: Analyze and describe the
impact that an exhibition or collection has on personal awareness of social,
cultural, or political beliefs and understandings.
Accomplished: Make, explain, and justify connections
between artists or artwork and social, cultural, and political history.
Advanced: Curate a collection of objects, artifacts,
or artwork to impact the viewer’s understanding of social, cultural, and/or
political experiences.
How does the
presenting and sharing of objects, artifacts, and artworks influence and shape
ideas, beliefs, and experiences? How do objects, artifacts, and artworks
collected, preserved, or presented, cultivate appreciation and understanding?
Visuals: Art History, Artist, information & examples
Lisa Orr
Steven Hill
Supplies, Materials
and Resources Needed: Materials, Technology websites, youtube, PowerPoint:
Glaze, Brushes, Spotify
Vocabulary: an
element or principle of design, or art concept that is being introduced that
relates to the lesson.
Glaze: to give a vitreous surface or coating to (a ceramic
or the like), as by the application of a substance or by fusion of the body.
Exhibit: to place on show
Definitions courtesy of http://dictionary.reference.com/
Teaching Procedure
Plan (with time needed for each part)
COMMUNITY TIME (30
MIN.) ARTIST STATEMENTS
A. Motivation/Hook/Introduction: Open with an
activity that will engage the students, with a technical skill, PowerPoint, introduction
to an artist or activity that relates to the lesson. (5 min.)
Since we are not going to bisque
the collaborative work from Week 3, have students use acrylic paint to add
color. (5 min.)
Students can brush
on the color, splatter, pour the paint onto the piece.
B. Instruction or Demonstration (2 min.)
Review how to properly apply
glaze to the surface of the clay. (2 min.)
Brush
on 3-4 layers, pour, dip, etc.
This part needs to
include what concept or skill the students are learning and how they will model
this in the lesson.
C. Work Period.
Supply distribution, task analysis of student-teacher interaction, clean up
procedures. What is happening step by
step in the lesson, what are the students doing for each part of the lesson
plan and how does it unfold?
Students will glaze the rest
of their ceramic works until 5 p.m.
Glazes will already be out and
available to students, along with brushes and containers to pour/dip their
ceramic pieces in.
As students are glazing, start
questioning which pieces they want to present at that show, and how they want
them presented. Students will have time to fully discuss this later, but they
should at least begin thinking about it.
With the
last 30 minutes of class, have students grab the pieces they want presented at
the show.
Have
them fill out the artist statement sheets provided for each of their works. (10
min.)
Next,
students will discuss how they are going to want their pieces displayed. (10
min.)
Show
websites of Lisa Orr and Steven Hill’s works. (3 min.)
Should they be propped up? Placed
on a box? Where should the artist statement be? Should there be other objects
placed on the table, as well? Should we keep all of our works separated or
grouped together by assignment?
D. Closure: Reflect/Share. What strategies
will I use to encourage sharing, complex communication, and critical thinking? What
questions will I ask the students to engage them to discuss their art? (10
min.)
Finally,
students will reflect on their work as a whole. (10 min.)
Where did you do best? Where did
you not do so well? Where would you like to improve? What direction are you
going to take with your work from here?
E. Rubric/Assessment/Evaluation:
This needs to be measurable and specific. How will the the objectives be
assessed? How will I know if the lesson was sucessful and the studentscan
demonstrate in their work knowledge of what the lesson covered.
| 0 | 1 | 2 | 3 | SCORE | |
| Student paid attention during class and participated in class discussion | Student did not participate in the activities | Student participated once or twice in the discussion, occassionally spacing off | Student paid attention during the whole class, and raised their hand in discussion 2-3 times | Student was an avid participator, and contributed meaningful ideas to the discussion | |
| Student presented clean and finished work | Seams were still visible, project requirements not achieved, work seemed unfinished | Work is acceptable, clean seams, but not all project requirements met | Work is finished, but failed to meet one to two of the requirements for the project | Work is finished, and all requirements are met | |
| Student used work time in class appropriately | Did not come to class, or if they did, did not work on project | Did some work during class time, but was goofing around/talking often and not staying on task | Did a decent job of staying on task, occassionally got distracted, but was able to get back to work | Worked hard on their project everyday in class, productive | |
| Student participated in clean up, leaving the room ready for the next class | Left the classroom without cleaning up their space or communal space | Somewhat cleaned up their area, did not help clean communal area | Their area is perfectly clean, minimal help in communal area | Left their area spotless, and contributed a lot to cleaning up communal areas | |
| Student properly glazed their pieces, and experimented with different techniques | Glaze was applied poorly, extremely thin | Glaze was applied unevenly | Glaze was applied properly, but only used one color | Glaze was properly applied, and student experimented with layering different glazes together | |
| Student put a lot of consideration into their self-relfection | Had nothing meaningful to say about their own work | Spoke only of where they did not succeed in their work | Provided some meaningful thoughts to their ceramic work | Provided honest and meaningful thoughts about their work | |
| Final Score | /18 | ||||
Lesson Plan 7 - Outline and Process
This class was dedicated to glazing all of the students ceramic pieces; a decision they had made earlier in the unit. The basics of glazing were discussed along with different glazing techniques, such as brushing, pouring, and dipping. Since they had a lot of work to glaze, most of the class time was dedicated to work time.
This was probably the most laid back lesson I had this whole unit, because once I showed them what to do they went right to it. A lot of the time was spent working and getting to know them more. I would remind them of different techniques if they were struggling with brushing, but other than that, there were no issues staying on task.


This was probably the most laid back lesson I had this whole unit, because once I showed them what to do they went right to it. A lot of the time was spent working and getting to know them more. I would remind them of different techniques if they were struggling with brushing, but other than that, there were no issues staying on task.


Subscribe to:
Posts (Atom)